Showing posts with label Gold. Show all posts

Wednesday, October 16, 2013

The Making of a Gold Pigment for the Black Hours Scroll

Recently I created a Peerage piece based on the Sforza Black Hours, which required the use of a lot of gold. When inspecting the original I came to the conclusion that the gold (and silver) were most likely applied with a brush or quill, as opposed to having been gilded.

I needed powdered gold to use as paint, and I needed a lot of it. This is how I made it.

A number of the period manuals describe the making of powdered (sometimes called pan or shell) gold by grinding it in a mortar with salt and honey, somewhat surprisingly I decided not to use that method for my own uses. I'm not entirely certain why. Instead I went with a method that I have read about on various websites pertaining to Orthodox iconography painting.

Most of the time I use gum arabic in dry powder form, just adding a little to my dry pigment as I begin the grinding process. For this method of making pan gold I needed a liquid, so my first step was to make a high-ratio gum Arabic solution.

A quick search of the internet bought me to the following instructions:

"To prepare the gum arabic-water solution you will need approximately one part of water to an equal amount in volume of gum arabic. The actual proportions here is not critical, but what is vital is that the consistency of the gum-water solution should be like thick honey. In a double boiler, heat the water and stir in the gum arabic. Powdered gum takes less time to dissolve then lumps, but complete dissolution still requires about two to three days. After the solution cools, cover and leave it until the solution is clear and the gum completely dissolved. Strain the gum solution through cheesecloth into a clean jar. Keep refrigerated when not in use for it spoils easily. Never heat this solution over a direct flame or heating element, for it will scorch."

Unfortunately I didn't make a note of the source (if anyone knows the source please let me know so that I can give due credit), but following these instructions I set about making my own.

Supplies for making a high-ratio
gum arabic solution.
Firstly, gather supplies - distilled water, gum arabic powder, a measuring cup, a saucepan, a cup (or bowl if you prefer), and a stirring device.

Fill the saucepan with regular tap water and place into this the cup/bowl, essentially creating a double-boiler. Measure out a quantity of the distilled water, in this case I measured out a 1/2-cup, and pour it into the cup/bowl. Turn on the stove and bring the water in the saucepan to a boil, which will in turn gently heat the water in the cup/bowl.

Dissolving powdered gum arabic
using a double-boiler method.
While this is happening, measure out the same quantity of gum arabic powder (1/2-cup). Once the distilled water is warm, start adding the powder one spoon at a time and mix well to dissolve. Eventually the top will get frothy and it will thicken to the consistency of honey.

Once you're happy with the consistency, pull the cup/bowl from the saucepan, cover (I used a small plastic sandwich bag) and set aside to cool down. At this point it looks very creamy-white. Once it's completely cool, place it in the fridge.

After a couple of days the powder will have dissolved further and have turned a clearer amber colour, like honey. Mine still has what looks like froth on the surface, I'm assuming that this might be undissolved powder but I'm not completely sure.

Straining gum arabicsolution through
a cloth to remove any parti
The next thing you want to do will be to strain it through a cloth to prevent any particulates being in your finished solution. I cut up a pair of stockings (art before beauty!) to use as a filter for this and let the solution drain into a Mason jar.

Grinding the Gold into Pigment
Before you begin, find a comfortable spot to sit with a solid surface in front of you. Next cue up a movie to watch to keep you occupied while you do this because it is BORING...

You will need a shallow dish of some sort. I have a set of porcelain dishes I got from an art supply store, in reality you could just use a saucer from the cupboard (ProTip: Goodwill is a fantastic place to shop for such things).

First, add a glob of the gum arabic solution to the clean dish, about the size of a US Quarter (25c). Onto this place a leaf of gold, the same as you would use for gilding (in my case 23k gold from John Neal Bookseller). With the pad of your index or middle finger tap down on the gold a few times until it disintegrates into the gum solution. Add another sheet of gold leaf and repeat the above process until you've used about 10 sheets. You may find that you have to add a little more gum arabic solution if things get to dry.

You should have something that looks a little like the picture to the left. Now, add a couple of drops of distilled water to moisten it a little. You're now going to sit there for an hour or so, grinding the gold solution with your finger-pad.


The dish of gold will start to look like this. Continue rubbing (grinding) the gold particles to make them as small as possible. Once you feel that you been grinding for long enough, do it some more.


Finally, add enough distilled water to your dish so that it covers the gold and creates a small lake. Swirl the water around just a little, "washing" the gold, not to much though as you don't want to remove to much of the gum arabic, then let it sit. Preferably covered, and preferably overnight. By doing this you're allowing the gold particles to completely settle on the bottom of the dish since they are heavier than the water. The water will appear clear. Use an eyedropper (available from a local pharmacy) to carefully remove as much of the water as you can, you won't get all of it. Let the remaining water evaporate.

Congratulations, you now have a gold paint that you can use with a brush, pen or quill. Reconstitute with a little water and use in a similar manner to gouache or watercolour. I found that it has a fairly "gritty" consistency and I'm currently unsure if this is what you get since it's a metal or if I just didn't grind the particles small enough during preparation.

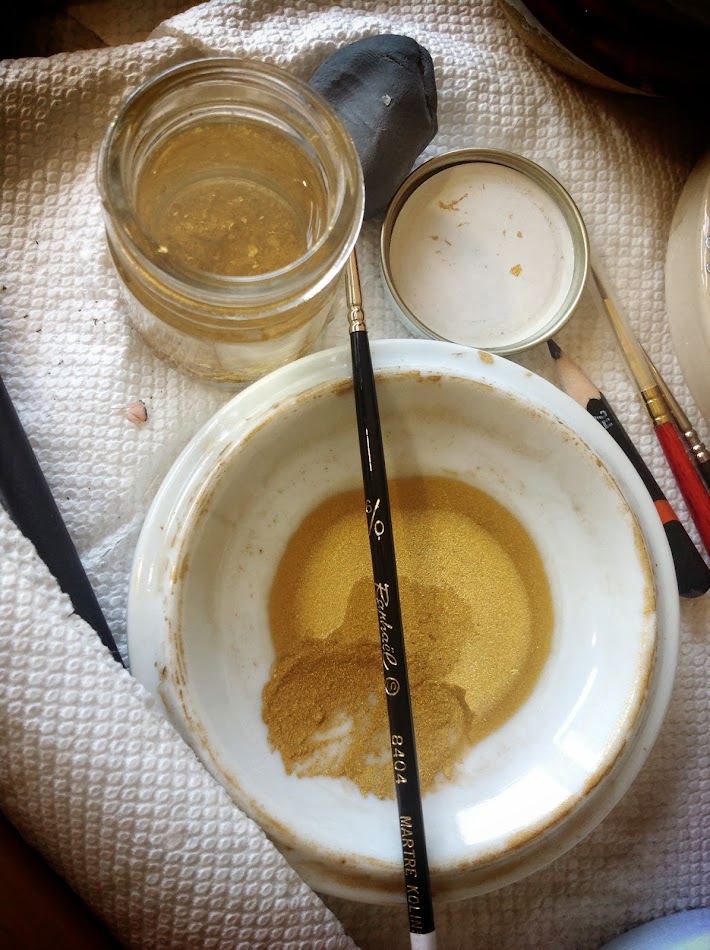
In the picture below you will notice a screw-top glass jar, this is dedicated rinse water for my brush. It allows me to trap any gold from the brush so that it can be re-prepared with my next batch of gold powder, thus not wasting any. For the same reason, when gilding I empty any random scraps into this jar.

Pan / powdered /shell gold for use with a brush or pen.


Sources:
CHOWDRY, Anita. The Alchemy of Pure Gold Pigment. 2011. Anita Chowdry. Web. September 2012. < http://anitachowdry.wordpress.com/2011/05/16/the-alchemy-of-pure-gold-pigment/ >

Author Unknown. The Technique of Shell Gold Painting. Natural Pigments. 2013. Web. July 2013. < http://www.naturalpigments.com/art-supply-education/cat/art-brush-info/post/technique-shell-gold-painting/ >

PORTER, Betsy. Making and Using Shell Gold. Art and Iconography. Web. January 2013. < http://www.betsyporter.com/shell_gold.html >

Friday, May 3, 2013

Holbein "Pearl Gold" (G641)

In my post Recommendations for Beginner Scribal Materials, I mentioned Holbein "Pearl Gold" gouache (G641) as being my favourite option for painted gold. I purchased mine through John Neal Booksellers, but I'm sure that it is available elsewhere.

A tube of Holbein "Pearl Gold" (G641) gouache.
In the past I have written the following about this product:

"Through extended use I have found that this modern, water-based paint gives a very similar colour to the 23k gold leaf I commonly use. Originally I found the dried result to appear streaky, however with improved application technique I have achieved a consistent, slightly raised finish.

Experience has taught me that the paint needs to be very wet in the palette-well but only soaking a small amount onto your brush. Make sure to mix the paint often, so as to keep the pigment consistent. When applying to the page it is best to work wet-to-dry by dabbing your freshly loaded brush onto the edge of the most recently painted area, essentially applying wet-to-wet. Once the fresh paint has run off the brush, begin to gently pull the paint towards the dry unpainted areas. You are dragging the paint outwards with the tip rather than painting with the full length of the brush. You want to drag the paint out just enough that you no longer have large watery areas, which will cause the page to crinkle, but not so much that it becomes to thin."

Gilding: Mediums, Mordants & Techniques (Dec 28, 2011)

Monday, March 25, 2013

Rhiannon de Carreg Cennen (Court Barony)

Court Baroness
Mudthaw and Baronial Investiture, Barony of Settmour Swamp
Awarded March 23, AS 47 (XLVII)


Monday, January 7, 2013

Thursday, December 27, 2012

Gilding: Liquitex Acrylic Gesso

I recently had a conversation with with someone regarding the use of modern Liquitex Acrylic Gesso as a gilding base. To be honest it's not something I'd ever contemplated since I jumped straight in with things like fish glue, garlic, glair and other period options. However, the questions regarding it's use do intrigue me though because although we strive to direct people in a period direction, they're not always ready to take the leap regardless of how easy to learn some of these techniques are.

See my Gilding: Mediums, Mordants & Techniques post for my personal thoughts of the various mordants I've experimented with.

Since I've never used the Liquitex Acrylic Gesso, I had to first educate myself on what it's used for. The Liquitex website says that it "provides the perfect tooth and adhesion to a wide variety of surfaces such as canvas, paper and wood" and is an "excellent base coat primer for many applications for example murals". For a more thorough description of modern acrylic gesso check out this Acrylic Paint Review page. What I get from this is that modern acrylic gesso's you seen in art supply stores are primer's, they seal the surface (paper, canvas etc...) with a non-porous layer that can then be painted on.

Now, for gilding we need a sticky component for the gold to adhere to and I'm assuming that the modern acrylic gesso's don't have this. A little more Google-Fu turns up two very similar recipes (Mistress Caitlin FitzHenry's and Madame Elizabeth de Nevell's), both of which combine the following components to create a gilding base:

  • ~ 4 parts acrylic gesso.
  • ~ 5 parts gloss varnish medium.
  • ~ 1 part sugar-water
  • Colour to tint.
I haven't tried these recipes yet so can't comment on how they work up, or how easy they are to use, although I will have to try it myself at some point. If you're so inclined I strongly suggest that you visit the linked recipe pages for full instructions, however please remember that there are more period alternatives that are readily available and just as easy to use. I always prefer to nudge people in a period direction but understand that, for a variety of reasons, others may prefer modern alternatives.

Keep an eye on this post for further updates once I've played with these recipes myself.

Wednesday, December 28, 2011

Gilding: Mediums, Mordants & Techniques

This is an ongoing project as I learn gilding techniques and better comprehend their application. As part of my own experimentation I have used supports that I am likely to use in a real application, 230gm pergamenata and 100lb Strathmore Bristol Vellum. My intent is to also make a similar test page on parchment when I get the chance. I am testing both modern and period mordants and paints.

There are sources detailing how to make period mordants for gilding, most common of which is Cennini’s Il Libro dell' Arte. My intent is to experiment with the various recipes so that I can make my own batches from scratch, however, since I wanted instant gratification I have so far been using mordants purchased from others.


Updated December 2012: Added information regarding my initial use of purchased gesso. 
Updated October 2012: Added initial thoughts on garlic/glair mixture.
Updated August 2012: Added my findings regarding initial tests of an acrylic-based modern gesso.
Updated July 2012: Minor edits.
Updated May 2012: Added early findings regarding the use of a fish-glue / water mixture, and also Kolner Miniatum.
Updated Dec 2011: Added photographs and re-edited body with more up-to-date information.