Showing posts with label Gilding. Show all posts

Wednesday, October 16, 2013

The Making of a Gold Pigment for the Black Hours Scroll

Recently I created a Peerage piece based on the Sforza Black Hours, which required the use of a lot of gold. When inspecting the original I came to the conclusion that the gold (and silver) were most likely applied with a brush or quill, as opposed to having been gilded.

I needed powdered gold to use as paint, and I needed a lot of it. This is how I made it.

A number of the period manuals describe the making of powdered (sometimes called pan or shell) gold by grinding it in a mortar with salt and honey, somewhat surprisingly I decided not to use that method for my own uses. I'm not entirely certain why. Instead I went with a method that I have read about on various websites pertaining to Orthodox iconography painting.

Most of the time I use gum arabic in dry powder form, just adding a little to my dry pigment as I begin the grinding process. For this method of making pan gold I needed a liquid, so my first step was to make a high-ratio gum Arabic solution.

A quick search of the internet bought me to the following instructions:

"To prepare the gum arabic-water solution you will need approximately one part of water to an equal amount in volume of gum arabic. The actual proportions here is not critical, but what is vital is that the consistency of the gum-water solution should be like thick honey. In a double boiler, heat the water and stir in the gum arabic. Powdered gum takes less time to dissolve then lumps, but complete dissolution still requires about two to three days. After the solution cools, cover and leave it until the solution is clear and the gum completely dissolved. Strain the gum solution through cheesecloth into a clean jar. Keep refrigerated when not in use for it spoils easily. Never heat this solution over a direct flame or heating element, for it will scorch."

Unfortunately I didn't make a note of the source (if anyone knows the source please let me know so that I can give due credit), but following these instructions I set about making my own.

Supplies for making a high-ratio
gum arabic solution.
Firstly, gather supplies - distilled water, gum arabic powder, a measuring cup, a saucepan, a cup (or bowl if you prefer), and a stirring device.

Fill the saucepan with regular tap water and place into this the cup/bowl, essentially creating a double-boiler. Measure out a quantity of the distilled water, in this case I measured out a 1/2-cup, and pour it into the cup/bowl. Turn on the stove and bring the water in the saucepan to a boil, which will in turn gently heat the water in the cup/bowl.

Dissolving powdered gum arabic
using a double-boiler method.
While this is happening, measure out the same quantity of gum arabic powder (1/2-cup). Once the distilled water is warm, start adding the powder one spoon at a time and mix well to dissolve. Eventually the top will get frothy and it will thicken to the consistency of honey.

Once you're happy with the consistency, pull the cup/bowl from the saucepan, cover (I used a small plastic sandwich bag) and set aside to cool down. At this point it looks very creamy-white. Once it's completely cool, place it in the fridge.

After a couple of days the powder will have dissolved further and have turned a clearer amber colour, like honey. Mine still has what looks like froth on the surface, I'm assuming that this might be undissolved powder but I'm not completely sure.

Straining gum arabicsolution through
a cloth to remove any parti
The next thing you want to do will be to strain it through a cloth to prevent any particulates being in your finished solution. I cut up a pair of stockings (art before beauty!) to use as a filter for this and let the solution drain into a Mason jar.

Grinding the Gold into Pigment
Before you begin, find a comfortable spot to sit with a solid surface in front of you. Next cue up a movie to watch to keep you occupied while you do this because it is BORING...

You will need a shallow dish of some sort. I have a set of porcelain dishes I got from an art supply store, in reality you could just use a saucer from the cupboard (ProTip: Goodwill is a fantastic place to shop for such things).

First, add a glob of the gum arabic solution to the clean dish, about the size of a US Quarter (25c). Onto this place a leaf of gold, the same as you would use for gilding (in my case 23k gold from John Neal Bookseller). With the pad of your index or middle finger tap down on the gold a few times until it disintegrates into the gum solution. Add another sheet of gold leaf and repeat the above process until you've used about 10 sheets. You may find that you have to add a little more gum arabic solution if things get to dry.

You should have something that looks a little like the picture to the left. Now, add a couple of drops of distilled water to moisten it a little. You're now going to sit there for an hour or so, grinding the gold solution with your finger-pad.


The dish of gold will start to look like this. Continue rubbing (grinding) the gold particles to make them as small as possible. Once you feel that you been grinding for long enough, do it some more.


Finally, add enough distilled water to your dish so that it covers the gold and creates a small lake. Swirl the water around just a little, "washing" the gold, not to much though as you don't want to remove to much of the gum arabic, then let it sit. Preferably covered, and preferably overnight. By doing this you're allowing the gold particles to completely settle on the bottom of the dish since they are heavier than the water. The water will appear clear. Use an eyedropper (available from a local pharmacy) to carefully remove as much of the water as you can, you won't get all of it. Let the remaining water evaporate.

Congratulations, you now have a gold paint that you can use with a brush, pen or quill. Reconstitute with a little water and use in a similar manner to gouache or watercolour. I found that it has a fairly "gritty" consistency and I'm currently unsure if this is what you get since it's a metal or if I just didn't grind the particles small enough during preparation.

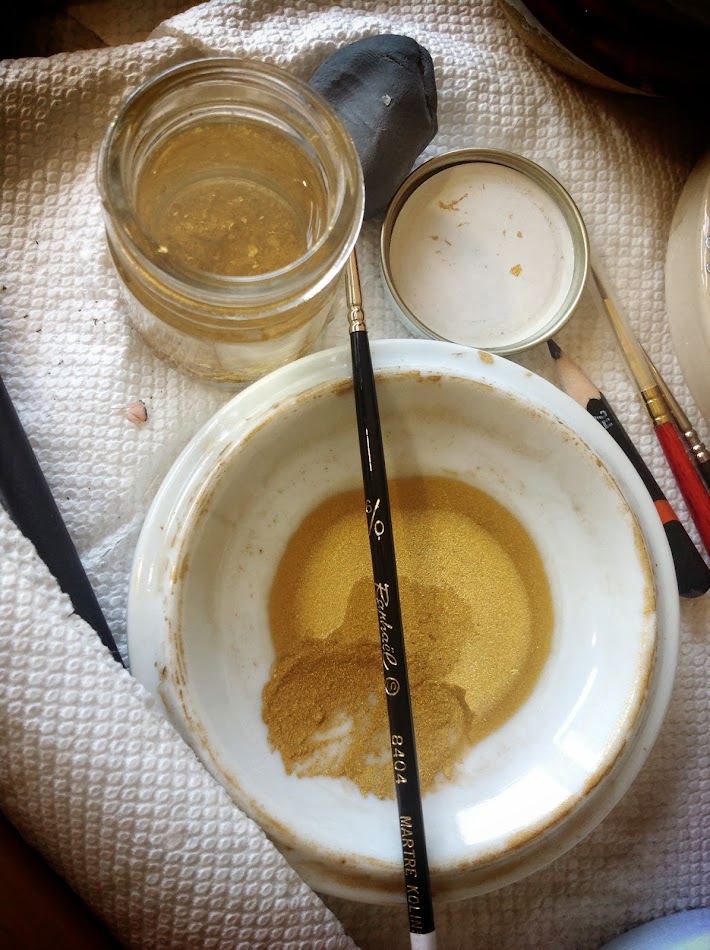
In the picture below you will notice a screw-top glass jar, this is dedicated rinse water for my brush. It allows me to trap any gold from the brush so that it can be re-prepared with my next batch of gold powder, thus not wasting any. For the same reason, when gilding I empty any random scraps into this jar.

Pan / powdered /shell gold for use with a brush or pen.


Sources:
CHOWDRY, Anita. The Alchemy of Pure Gold Pigment. 2011. Anita Chowdry. Web. September 2012. < http://anitachowdry.wordpress.com/2011/05/16/the-alchemy-of-pure-gold-pigment/ >

Author Unknown. The Technique of Shell Gold Painting. Natural Pigments. 2013. Web. July 2013. < http://www.naturalpigments.com/art-supply-education/cat/art-brush-info/post/technique-shell-gold-painting/ >

PORTER, Betsy. Making and Using Shell Gold. Art and Iconography. Web. January 2013. < http://www.betsyporter.com/shell_gold.html >

Monday, April 29, 2013

Recommendations for Beginner Scribal Materials

Does this sound like you...

"Mostly I don't know where to start. I like to look at all of the pretty scrolls but I don't know what basic supplies to get to start trying."

It certainly sounded like me when I first started, and even though I have an art background I had no clue how to get started or what supplies I needed. I spoke with a few people, found a few online scribal communities, joined some email lists, and asked a few questions. There was however a lot of trial and error and although I've gained confidence and skill I still remember those first tentative steps, so here are my recommendations for beginners on the types of tools and materials to equip themselves with.

Firstly, buy the tools and materials that YOUR budget will allow. Also, remember that materials (and by extension your art) end up being very personal, so what one artist loves another one dislikes. These recommendations are just MY opinion, try different tools and materials as your time and budget permit - if you love them, great. If not, then try something else until you find something you do like.

Strathmore 300 Series Bristol Board - In reality it's just thick, multi-medium paper and comes in a smooth  or textured finish. The smoother finishes are much nicer for calligraphy. It can usually be found in local arts and crafts stores, various online stores also carry it. Look for “acid-free” paper to prevent degradation over time. I have both a 9 x 12 and an 11 x 14 pad, one in the "smooth" finish and the other in the "vellum" finish. Both have successfully been used to complete scribal assignments.

Artist Paint Brushes - You'll want to build a selection of small, "round" brushes that have a point. Look for brushes that have at least one "0", preferably multiple "0000" or "3/0" - that's their size. Synthetic hair is fine, and cheaper. "Gold Scepter" is a brand that springs to mind that is readily available in the smallest sizes and perform very well.

Artists Goauche - I am a fan of the Windsor & Newton goauche ("artist" or "designer", rather than "student" grade). However there are other brands, for example I hate the W&N gold but I LOVE the Holbein brand counterpart (Pearl Gold - G641). I will say that if you're going to splurge on anything, gouache should be that thing and as a very general rule, the more expensive the tube the higher the pigment concentration. You can usually buy basic colour sets, or you can buy individual tubes of the colours you need. Try to stick to one manufacturer as much as possible so that the ingredients don’t “fight” over time. When I first started, I just bought individual tubes as I needed them and initially found the following W&N colours to be the most useful - "Ultramarine", "Brilliant Yellow", "Cadmium Red", "Permanent White" and "Jet Black"

Personally I find the "student grade" paints chalky so they end up looking pale or weird on the page. This is a personal gripe I have from my college days though, others may disagree with me.


Pens for Calligraphy - You can usually buy basic calligraphy nibs and holders in sets at the art store. Speedball brand is probably what you will find and they do the job just fine. Each set will have a variety of nib sizes to create different size letters, but make sure at least one of the nibs comes to a fine-point so that you can use it for drawing the lines for your art work.

Ink for Calligraphy - Art stores will usually carry a large selection of inks in various colours. Sometimes, you'll get lucky and find "Iron Gall Ink" or "Oak Gall Ink". If your store carries either of these then buy it and take pride in the fact that you have your first (depending on the recipe and production) period artist material. Iron Gall Ink is my default and I very rarely use anything else because I love the way it flows from my nibs.

Now, I haven't personally seen Iron / Oak Gall Ink sold in any of the stores I've been in (I buy it online), therefore my other beginner recommendation for dip-pens is Sumi black ink. It comes in a bright green, heavy plastic bottle with a black cap and the ink itself has a nice viscosity to it. A word of warning though, it is very corrosive on your nibs if you don't clean them properly. It's very black, and works really well for line-work. You can also find this ink in red (red bottle, black cap).

Pencil - Used for sketching out your artwork and drawing your calligraphy guidelines. When you're at the art store you'll notice that they are graded, "B's" with a higher number being the softest through "HB" which is the middle and then into "H's" which are considered hard. You're looking for a grade that won't damage the surface you'll be working on and that can be erased easily.

Personally I opt for a 2H as it works FOR ME, but choose a grade that will work for the type of pressure you're likely to apply while using it. To hard and it will damage your surface, to soft and you'll have a tougher time while erasing.

Rubber / Eraser - Many scribes swear by those blocky, hard rubbers you probably used in school, just make sure that it's white to avoid potentially marking the page. These can be purchased in a variety of places.

I personally find those hard white rubbers a little weird to use and dislike them. I tend to use what is known as a "putty rubber" or "kneadable eraser" as it works better for me. These are usually found near the pencil selection in the art store.

Straight Edge - You'll need some sort of ruler to mark out your page and draw the lines you'll need for calligraphy. Rulers can be purchased in a variety of materials, lengths and styles. Personally I recommend that you buy one made out of metal as plastic and wooden rulers have the potential of being sliced by your craft knife, thus ruining the straight edge. If you can find one that has a cork backing even better, as this raises the edge off the page a little and helps avoid bleeding or smudging.

Paint Palette - Cheap, multi-well plastic palettes can be found at arts and crafts stores. However, you could also use a dinner plate, ceramic tiles, muscle (or other crustacean) shells, a glass ashtray or any other number of household items you probably already own.


Other Random Supplies - Although you don't NEED any of the following supplies they're useful to have around.
  • Distilled Water - I tend to use this rather than regular tap water to avoid the various additives combined at the treatment plants. One argument is that because it's "purer" it's closer to period water, but who knows if this is true or even really matters.
  • Eye-dropper / Pipette - Found at pharmacies, they end up being very useful for adding very small amounts of water to your paints to thin them.
  • Scalpel / Craft Knife - If you're buying the pads of Bristol paper you probably won't need a craft knife as they're already sized appropriately. However they useful to have around.
  • Cotton Ear-Buds - Yes, the things you clean your ears with. They're actually very useful dipped in rubbing alcohol to clean your calligraphy nibs.
  • Rubbing Alcohol - As mentioned above, rubbing alcohol is great for cleaning your calligraphy nibs.
  • Magnifier - Helps you not strain your eyes! 
  • 100% Talc - Wash your hands, dry them and then coat them in talc. It's stop your hands from sweating while you work.
  • Scrap Paper - Rest your hand on some scrap paper while you work as it will protect the page you're working on from getting greasy and picking up smudges. Hands are dirty!
Useful Links - There are numerous online resources for the things I have mentioned in this post, below are a few of the websites I find useful. Remember to check your local arts and crafts stores as many of these items can be found there.

Monday, January 7, 2013

Wednesday, December 28, 2011

Gilding: Mediums, Mordants & Techniques

This is an ongoing project as I learn gilding techniques and better comprehend their application. As part of my own experimentation I have used supports that I am likely to use in a real application, 230gm pergamenata and 100lb Strathmore Bristol Vellum. My intent is to also make a similar test page on parchment when I get the chance. I am testing both modern and period mordants and paints.

There are sources detailing how to make period mordants for gilding, most common of which is Cennini’s Il Libro dell' Arte. My intent is to experiment with the various recipes so that I can make my own batches from scratch, however, since I wanted instant gratification I have so far been using mordants purchased from others.


Updated December 2012: Added information regarding my initial use of purchased gesso. 
Updated October 2012: Added initial thoughts on garlic/glair mixture.
Updated August 2012: Added my findings regarding initial tests of an acrylic-based modern gesso.
Updated July 2012: Minor edits.
Updated May 2012: Added early findings regarding the use of a fish-glue / water mixture, and also Kolner Miniatum.
Updated Dec 2011: Added photographs and re-edited body with more up-to-date information.