Showing posts with label Gum Arabic. Show all posts

Monday, December 9, 2013

Guild Mirandola's Oak Gall Ink Kit

Or, Isabel and Aife have a playdate.

At one of the recent SCA events I attended there was an auction and one of the items was a bag full of scribal goodies. Of course I had to have that baggie, but if truth be told I feel a little guilty for paying so little for goods worth A LOT more. One of the items in the baggie was an Oak Gall Ink Kit from Guild Mirandola, a small scribal supplies vendor here in the East Kingdom.

Aife needed ink for something she's working on, and I just happened to have the supplies available. What follows isn't my own work, it's what happened when we followed the instructions included in the Kit. I'm not going to specifically detail the instructions and ingredients here as I feel that would be unfair to Guild Mirandola (Doscelina's contact information can be found on the website). The Kit contains very easy to follow instructions and I strongly recommend that people buy the Kit. This is period-style ink making made so simple that ANYONE can do it.


Although the Oak Gall Ink Kit contains exactly the about of ingredients you need, we actually ended up making double what was specified because I had my own supplies already but had never actually gotten around to using them. Other items needed are easy to lay your hands on and should be readily available to most people.

Crushed gall nuts in the mortar.
First order of business was to set up the gum arabic crystals to dissolve while we followed the rest of the instructions. Once that was set up we needed to crush the gall nuts. They were shoved into a plastic ziplock bag, that was then wrapped in a kitchen towel and then smashed vigorously with a hammer borrowed from my "shop gnome". Once they'd been reduce to much smaller pieces they were transferred to the mortar and pestle and ground into "a fine powder".

I do want to comment on how annoying these were to grind, they proved to be much tougher than I had imagined. They are surprisingly hard and I actually ended up with a blister in the center of my hand from the grinding. Get around this by getting them as broken and small as you possibly can with the hammer. The smaller they are before they hit the mortar and pestle, the less hand grinding you'll need to do.

You'll end up with this...

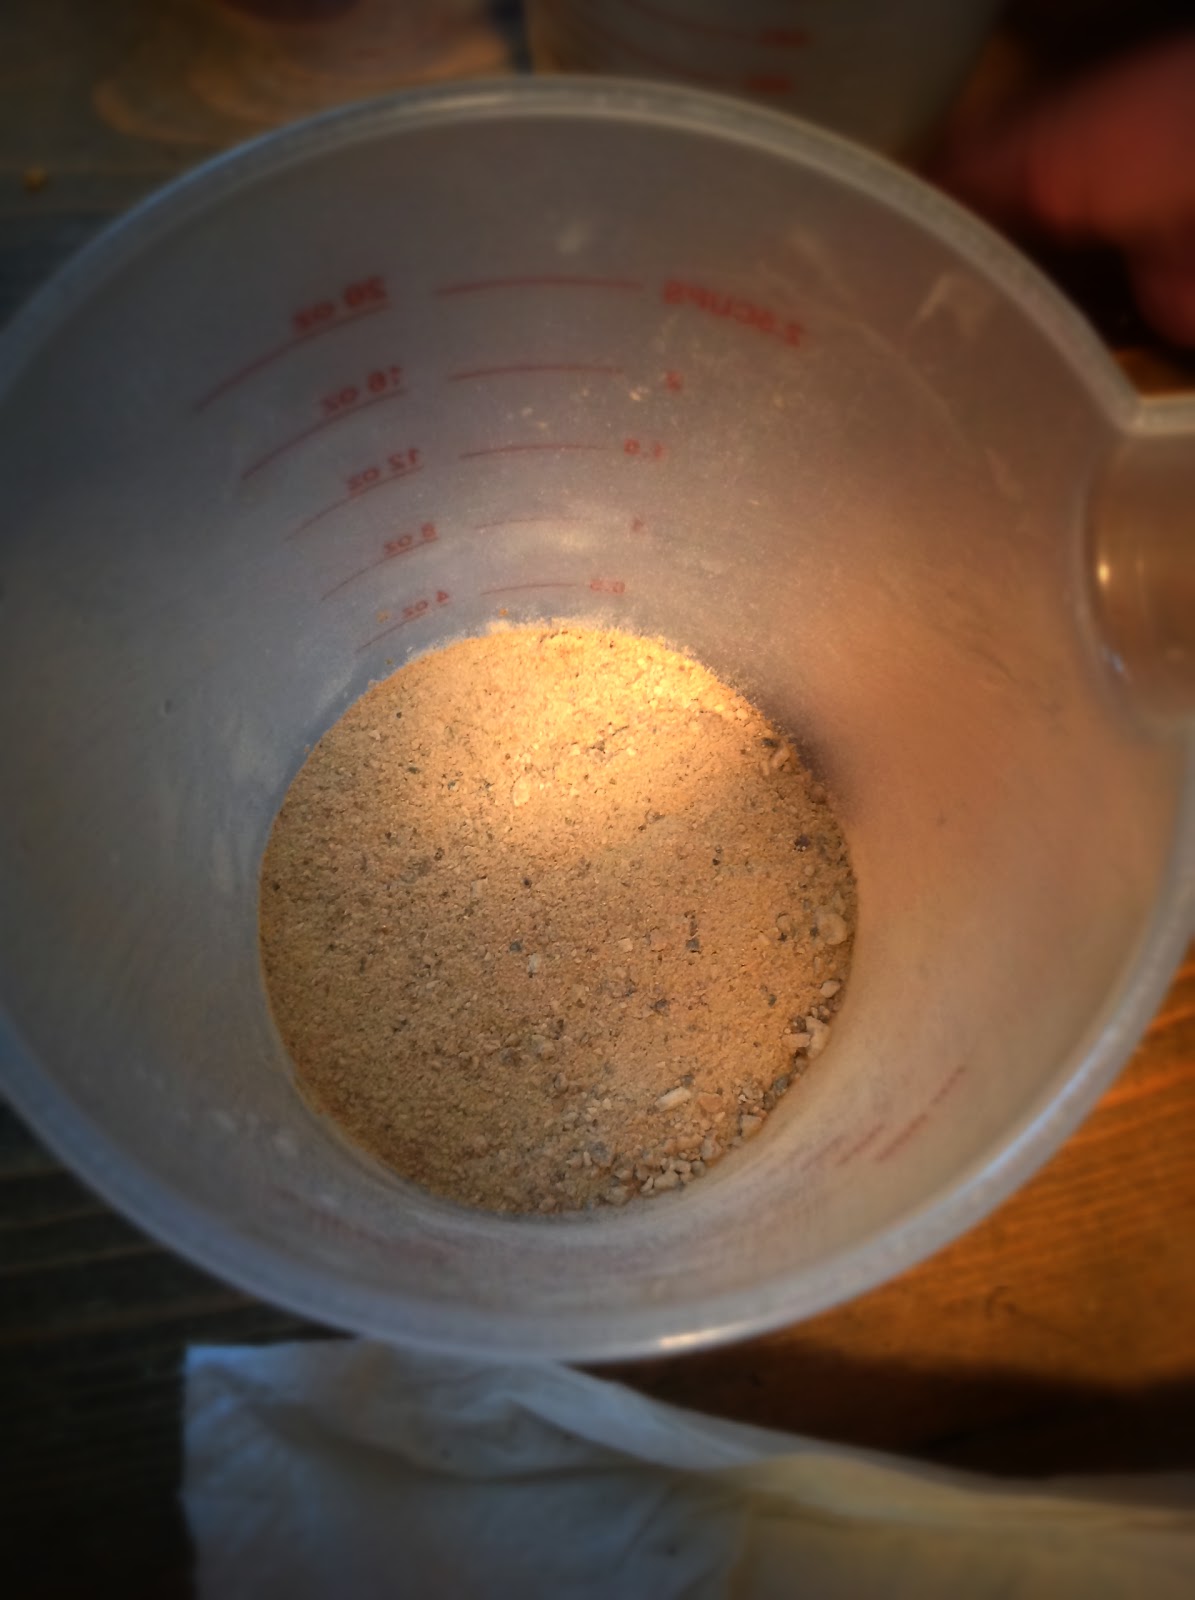
Gall nuts reduced to "fine powder"
Continuing to following the instructions, add the water and let it sit. So just how patient are you? We were working on a couple of other projects at the same time, so our little container of brown gunk actually ended up marinating for well over an hour. It has a VERY earthy smell which I surprisingly found quite pleasant.

Back to following the instructions that came with the kit and we find that it's time to add the green ferrous sulfate. The instructions say that when you add this to the brown gunk it will start to turn black immediately, and it did! We both stood there, staring into the jug saying "that's SO COOL!". We then stirred vigorously so that everything was thoroughly mixed.

Oak gall "tea" after the ferrous sulfate has been added.
Next step was to filter the mixture through some linen to remove all the nasty gunky bits. We used a piece of natural coloured linen which we first saturated with water to help the process along.

Oak gall ink mixture being filtered through linen to remove the debris.
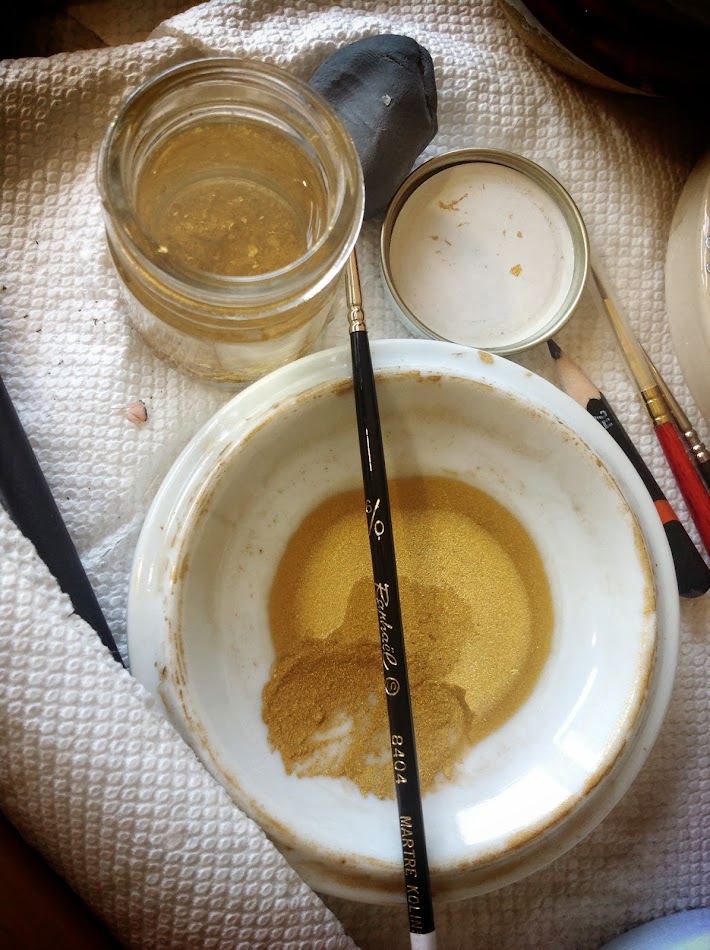
We ended up with about a half of a pint-sized Mason jar of black liquid, basically a dye, and to this was added the gum arabic which we had been dissolving. The addition of the gum arabic provides the binder (glue) that turns the dye into an ink, making it stick to a page.

Upon testing, we found that we had achieved a nice writable ink in a viscosity that I liked. I will admit to being a little surprised at how black it was straight out of the jar, I was expecting it to initially write quite faint (it darkens over time) and be almost translucent but it wasn't.

Very rough draft writing with the ink made from the Guild Mirandola Oak Gall Ink Kit.


A word on dissolving the gun arabic crystals. We found that keeping the solution warm helped the crystals dissolve at a much better rate. We had allowed the water to cool while we worked on other things, it really delayed the process and the crystals stuck to our stir-stick.

For detailed instructions and supplies please purchase one of these
Oak Gall Ink Kits from Guild Mirandola

Wednesday, October 16, 2013

The Making of a Gold Pigment for the Black Hours Scroll

Recently I created a Peerage piece based on the Sforza Black Hours, which required the use of a lot of gold. When inspecting the original I came to the conclusion that the gold (and silver) were most likely applied with a brush or quill, as opposed to having been gilded.

I needed powdered gold to use as paint, and I needed a lot of it. This is how I made it.

A number of the period manuals describe the making of powdered (sometimes called pan or shell) gold by grinding it in a mortar with salt and honey, somewhat surprisingly I decided not to use that method for my own uses. I'm not entirely certain why. Instead I went with a method that I have read about on various websites pertaining to Orthodox iconography painting.

Most of the time I use gum arabic in dry powder form, just adding a little to my dry pigment as I begin the grinding process. For this method of making pan gold I needed a liquid, so my first step was to make a high-ratio gum Arabic solution.

A quick search of the internet bought me to the following instructions:

"To prepare the gum arabic-water solution you will need approximately one part of water to an equal amount in volume of gum arabic. The actual proportions here is not critical, but what is vital is that the consistency of the gum-water solution should be like thick honey. In a double boiler, heat the water and stir in the gum arabic. Powdered gum takes less time to dissolve then lumps, but complete dissolution still requires about two to three days. After the solution cools, cover and leave it until the solution is clear and the gum completely dissolved. Strain the gum solution through cheesecloth into a clean jar. Keep refrigerated when not in use for it spoils easily. Never heat this solution over a direct flame or heating element, for it will scorch."

Unfortunately I didn't make a note of the source (if anyone knows the source please let me know so that I can give due credit), but following these instructions I set about making my own.

Supplies for making a high-ratio
gum arabic solution.
Firstly, gather supplies - distilled water, gum arabic powder, a measuring cup, a saucepan, a cup (or bowl if you prefer), and a stirring device.

Fill the saucepan with regular tap water and place into this the cup/bowl, essentially creating a double-boiler. Measure out a quantity of the distilled water, in this case I measured out a 1/2-cup, and pour it into the cup/bowl. Turn on the stove and bring the water in the saucepan to a boil, which will in turn gently heat the water in the cup/bowl.

Dissolving powdered gum arabic
using a double-boiler method.
While this is happening, measure out the same quantity of gum arabic powder (1/2-cup). Once the distilled water is warm, start adding the powder one spoon at a time and mix well to dissolve. Eventually the top will get frothy and it will thicken to the consistency of honey.

Once you're happy with the consistency, pull the cup/bowl from the saucepan, cover (I used a small plastic sandwich bag) and set aside to cool down. At this point it looks very creamy-white. Once it's completely cool, place it in the fridge.

After a couple of days the powder will have dissolved further and have turned a clearer amber colour, like honey. Mine still has what looks like froth on the surface, I'm assuming that this might be undissolved powder but I'm not completely sure.

Straining gum arabicsolution through
a cloth to remove any parti
The next thing you want to do will be to strain it through a cloth to prevent any particulates being in your finished solution. I cut up a pair of stockings (art before beauty!) to use as a filter for this and let the solution drain into a Mason jar.

Grinding the Gold into Pigment
Before you begin, find a comfortable spot to sit with a solid surface in front of you. Next cue up a movie to watch to keep you occupied while you do this because it is BORING...

You will need a shallow dish of some sort. I have a set of porcelain dishes I got from an art supply store, in reality you could just use a saucer from the cupboard (ProTip: Goodwill is a fantastic place to shop for such things).

First, add a glob of the gum arabic solution to the clean dish, about the size of a US Quarter (25c). Onto this place a leaf of gold, the same as you would use for gilding (in my case 23k gold from John Neal Bookseller). With the pad of your index or middle finger tap down on the gold a few times until it disintegrates into the gum solution. Add another sheet of gold leaf and repeat the above process until you've used about 10 sheets. You may find that you have to add a little more gum arabic solution if things get to dry.

You should have something that looks a little like the picture to the left. Now, add a couple of drops of distilled water to moisten it a little. You're now going to sit there for an hour or so, grinding the gold solution with your finger-pad.


The dish of gold will start to look like this. Continue rubbing (grinding) the gold particles to make them as small as possible. Once you feel that you been grinding for long enough, do it some more.


Finally, add enough distilled water to your dish so that it covers the gold and creates a small lake. Swirl the water around just a little, "washing" the gold, not to much though as you don't want to remove to much of the gum arabic, then let it sit. Preferably covered, and preferably overnight. By doing this you're allowing the gold particles to completely settle on the bottom of the dish since they are heavier than the water. The water will appear clear. Use an eyedropper (available from a local pharmacy) to carefully remove as much of the water as you can, you won't get all of it. Let the remaining water evaporate.

Congratulations, you now have a gold paint that you can use with a brush, pen or quill. Reconstitute with a little water and use in a similar manner to gouache or watercolour. I found that it has a fairly "gritty" consistency and I'm currently unsure if this is what you get since it's a metal or if I just didn't grind the particles small enough during preparation.

In the picture below you will notice a screw-top glass jar, this is dedicated rinse water for my brush. It allows me to trap any gold from the brush so that it can be re-prepared with my next batch of gold powder, thus not wasting any. For the same reason, when gilding I empty any random scraps into this jar.

Pan / powdered /shell gold for use with a brush or pen.


Sources:
CHOWDRY, Anita. The Alchemy of Pure Gold Pigment. 2011. Anita Chowdry. Web. September 2012. < http://anitachowdry.wordpress.com/2011/05/16/the-alchemy-of-pure-gold-pigment/ >

Author Unknown. The Technique of Shell Gold Painting. Natural Pigments. 2013. Web. July 2013. < http://www.naturalpigments.com/art-supply-education/cat/art-brush-info/post/technique-shell-gold-painting/ >

PORTER, Betsy. Making and Using Shell Gold. Art and Iconography. Web. January 2013. < http://www.betsyporter.com/shell_gold.html >

Monday, September 9, 2013

Diego Miguel Munoz de Castilla (Pelican)

Order of the Pelican
River Wars, Barony of Iron Bog
Awarded September 7, AS 48 (XLVIII)


Peerage scroll for Diego Miguel Munoz de Castilla displaying the Kingdom arms of Ansteorra, Aethelmearc, and the East.

My very first Peerage piece.

At some point after Diego received his Writ, Alys had him look through examples of manuscripts to get a feel for what he might like and of course he fell in love with the Sforza Black Hours she had received when she was made a Tyger of the East. Black Hours he would like, Black Hours he would get.

I've never attempted this style before, however Nataliia had just completed one. We managed to find time to sit down at Pennsic for a couple of hours so that I could pick her brain and play with the materials she had used. It was useful, and she was able to confirm many of the assumptions I'd initially had upon receipt of the assignment. To say I was intimidated is a major understatement.

Sforza Black hours - ÖNB Cod1856 f61
Ms 1856, f.61
All of the Black Hours I've looked at appear to be written in silver with one set of notable exceptions, those contained in the Mira Calligraphiae Monumenta [1] housed in the Getty collection. These pages are usually folios of parchment dyed black during the stretching and scraping process.

Since real silver is likely to tarnish [2] I'm using my W&N silver gouache. The calligraphy is done in this same gouache, watered down so that it flows easily from the nib (Mitchell #5). Writing silver on the black paper wasn't as difficult as I had imagined it would be, although it did take almost twice as long as writing in regular ink. The biggest issue was that I needed to continually mix the gouache [3] and clean my nib every few words so that I could keep a fairly consistent and sharp line for the writing. I also had to use a larger nib than I had wanted since I just couldn't achieve crisp lines with my usual #6 nib. As a by-product the entire piece is larger than I had originally wanted it to be.

This project requires A LOT of gold. The few images I have available to me for the Sforza Hours suggest that most of the gold appears to be painted rather than gilded. For the guide-lines and the written gold words I used my Holbein gold gouache since it works in the same fashion as the silver and was just easier. However for the rest of this piece I wanted a more dramatic luminescence than the gouache offers, so I made my own powdered gold out of the 23k sheets I use for gilding (keep an eye out for a follow up instruction post for this!).

Sforza Black hours - ÖNB Cod1856 f32v - four evangelists
Ms 1856, f.32 verso
My next step was the illustration of the Pelican. I chose to use white gouache as I wasn't sure how much workable paint I would actually need and I just don't have that much lead-white here. My biggest challenge was remembering that when working on a dark ground you're essentially painting in reverse, you're painting the highlights and letting the black ground act as the shadows. I do love how this illustration came out, although I'm not sure I've really managed the correct medieval aesthetic. I would say that mine looks "heavy" by comparison, although this could just be the nature of filling the area with a giant white bird.

Just when I was completely sick of working in white I was finally able to switch to the 23k powdered gold I had created specifically for this piece. To accompany my dish of prepared gold pigment, I also have a small dedicated jar which contains distilled water to collect any scraps from my dedicated gold paintbrush. By doing this I'm always cleaning the dedicated brush in clean water and retaining any fragments during the process, these can then again be prepared for use as gold pigment at a later date.

The gold work actually became as annoying as the white work due to the length of time it ended up taking. It didn't go on nearly as smoothly as I hoped that it would, even though my paint was "wet". In hindsight I wonder if it needed he gold grains to be finer by more grinding.

The silver within the borders was done concurrently with the gold so that I would keep the flow looking consistent.

Next came the colours, all of which went on smoothly and easily. In testing I found that my Cadmium Red gave a much nicer colour than the Spectrum Red that I tend to use more often. My guess is that because the Cadmium Red leans towards orange/yellow it played well against the substantial amount of gold. The Ultramarine blue was cut with a little Permanent White as Nataliia had suggested during out time at Pennsic, it makes for a more vibrant colour than the base tube-colour.

Diego has served over many years in three separate Kingdoms which I was asked to represent on this piece, the roundels within the borders made an ideal location for these; from left to right - Ansteorra, Aethelmearc, and the East. The fourth is Sharc, an East Kingdom household of which Diego is a member. His arms are displayed in the decorated initial D.

Sforza Black hours - ÖNB Cod1856 f32verso-33recto Details:
Calligraphy & Illumination by Isabel Chamberlaine.
Inspired by the Black Hours of Galeazzo Maria Sforza as seen to the right.

Paper: Black 120gsm paper (I forget which brand).
Materials: Holbein "Pearl Gold" and Windsor & Newton "Silver" gouaches for layout lines, calligraphy, and select details. 23k powdered gold in a gum arabic binder for the majority of gold-work. Various W&N gouache for any of the coloured areas.

Text by Alys Mackyntoich
We, Gregor, by right of arms King of the East, and Kiena, his Queen, considering the great, long and earnest travails and labours sustained by Diego Miguel Munoz de Castilla in the service of the art of defence and the safe practices of same for some score of years and more, and after due consideration of the cause above-written and other good and thankful service done by the said Diego to our sister realms of Aethelmearc and Ansteorra, do therefore ordain, approve and confirm the elevation of the said Diego to the Order of the Pelican, and do convey therewith all liberties and privileges attendant thereupon. And we do further by these our present letters give, grant and convey to the said Diego the right to bear arms by letters patent in the following form:  Argent, on a bend sable three escallops palewise argent.  And we do further ratify and approve, for ourselves and our successors, that the gifts and grants made herein shall be in all time coming effectual, good, valid and sufficient perpetually in all and sundry points, and do hereby ordain the same to be put to due execution, and to have full force, strength and effect in all time coming.  Given at Iron Bog upon 7 September in the forty-eight year of the Society.


Footnotes:
[1] This was confirmed during a class I happened to take at Pennsic 2013 that presented findings by the Getty that the black hours contained within the Mira Calligraphiae Monumenta were actually created using a resist technique. Although I need to track down the original source from the Getty, the gist of it was that the calligraphy was written with some sort of resist on white paper, it was then washed over in black ink to create the dark page. The resist is then rubbed away to reveal the calligraphy as the white of the page.

[2] I really do need to test out the tarnishing of real silver on the work we do in the SCA. Just how long does silver-leaf take to tarnish?

[3] Both silver and gold gouache need to be regularly mixed since the metallic pigment has a tendency to settle.

Scroll ID: Isabel C XLII
Completed Sept. 5, 2013